How to Make a Glass Candle Vase with Greenery in Minutes
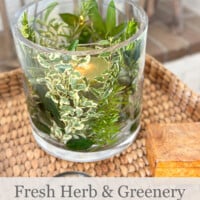
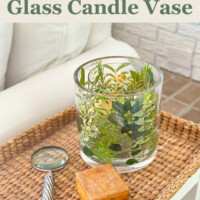
Did you know that your garden and yard are hiding decorating treasure that can easily transform the ambiance of any room in your home? Learn how to create a beautiful glass candle vase in minutes using thrift store vases along with fresh herbs and greenery that can be found right out your door.
When decorating my home I always like to bring in as many natural elements as as possible. I keep in mind – earth, fire, water, and air by using seasonal flowers, tree branches, rocks, driftwood and whatever else I find outside that looks interesting. Adding a dose of creativity to my finds makes them decor worthy.
Seeing these elements mixed in with the many DIY candle holder ideas I use to decorate around the house that I add for the fire element makes me smile.
Along with adding the natural elements in my home decor, you know how I like to reuse and repurpose everything when decorating. Bringing together these two loves is just what I did to make something new for my home decor by using these two thrift store glass vases in a new way to decorate a table in my living room.
Another perk of reusing decor in new ways that you already own is you save money and don’t have to find storage space for when that something new is not being used.
I didn’t come up with this DIY project on my own, but have shared 12 Easy Clear Glass Vase Decoration Ideas with you over the years. I stumbled upon this easy to assemble candle vase idea when paging through a decorating magazine while waiting in the grocery store line last week. I knew I had to assemble one and share the idea with you.
Not only is this candle vase with greenery fast and easy to make assemble, no DIY skills or tools are needed. Once assembled the warm glow of the candle vase makes a unique table centerpiece or table decoration with added benefits coming from the fragrant, natural aroma of the fresh herbs.
Instructions: How to Make a Glass Candle Vase With Greenery & Herbs

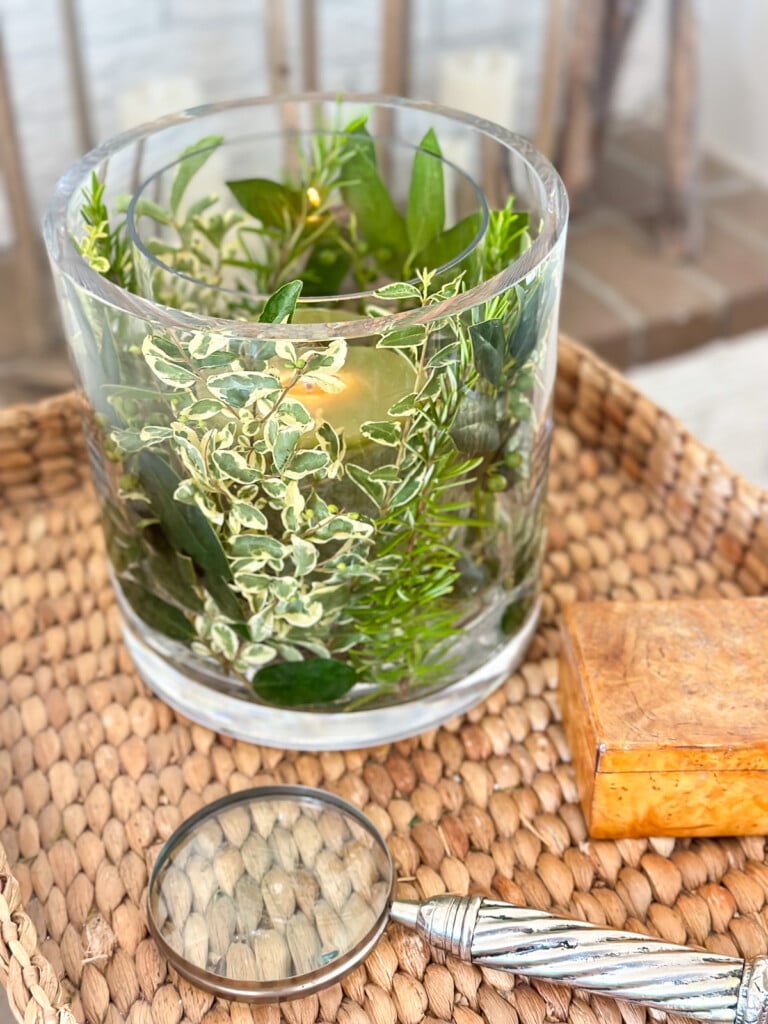
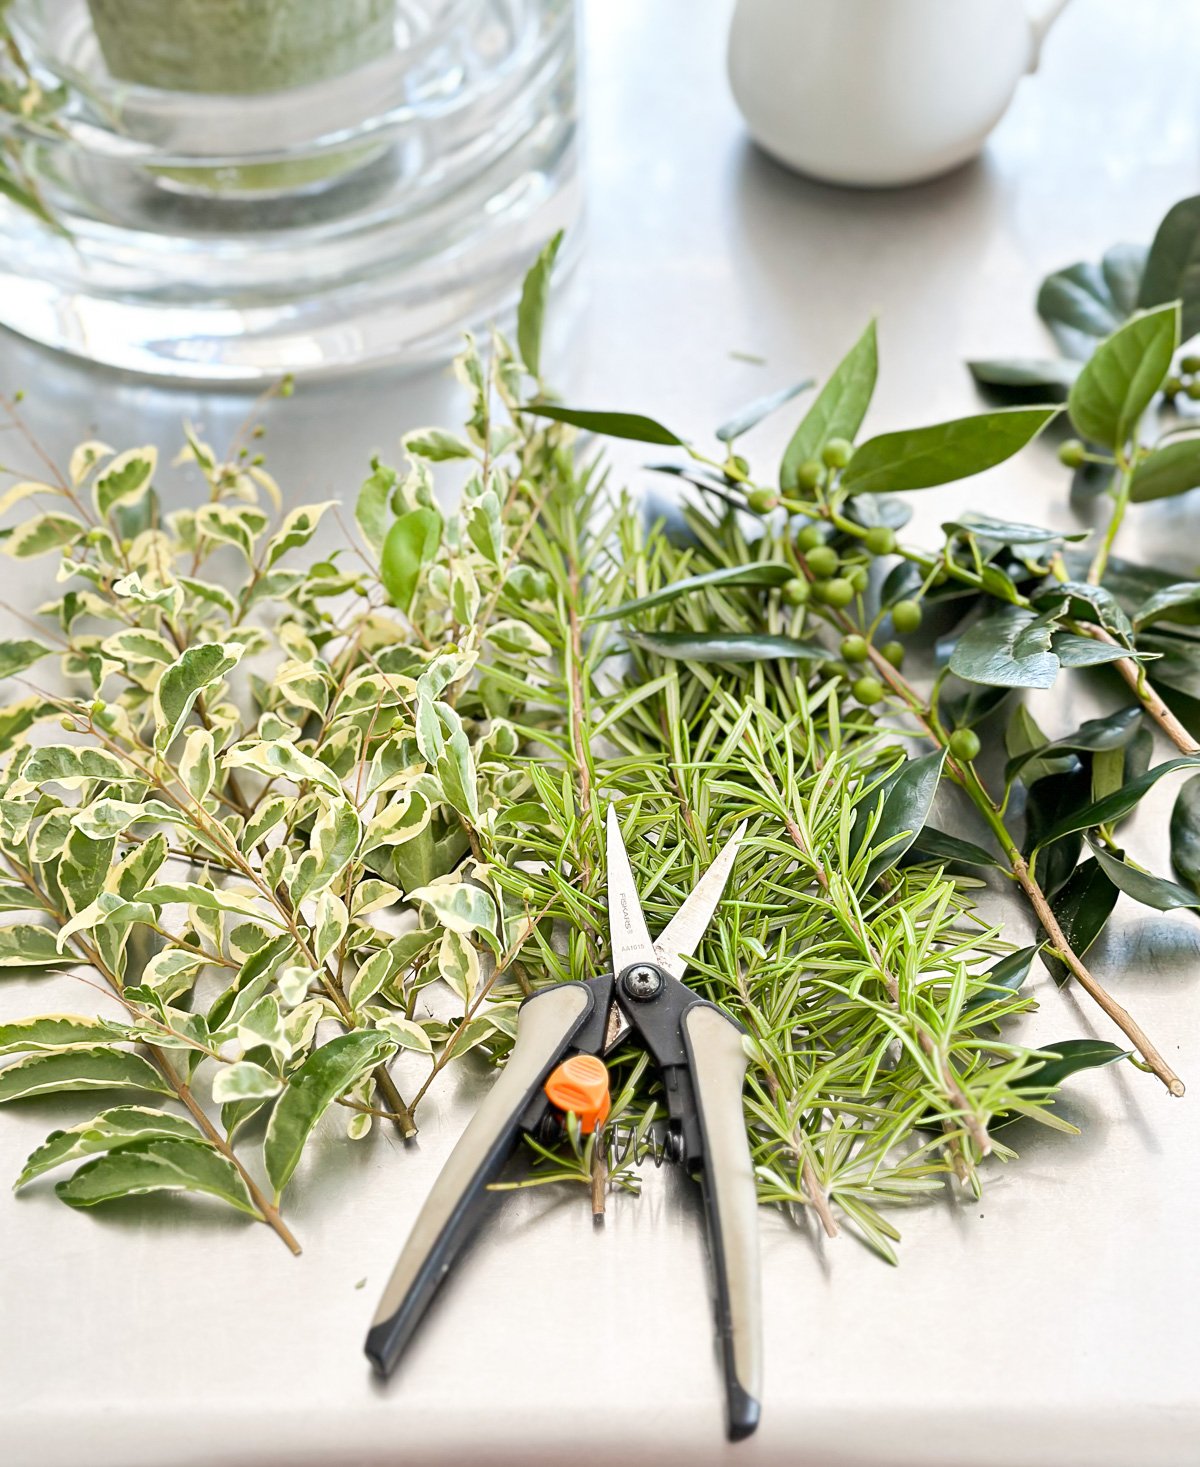
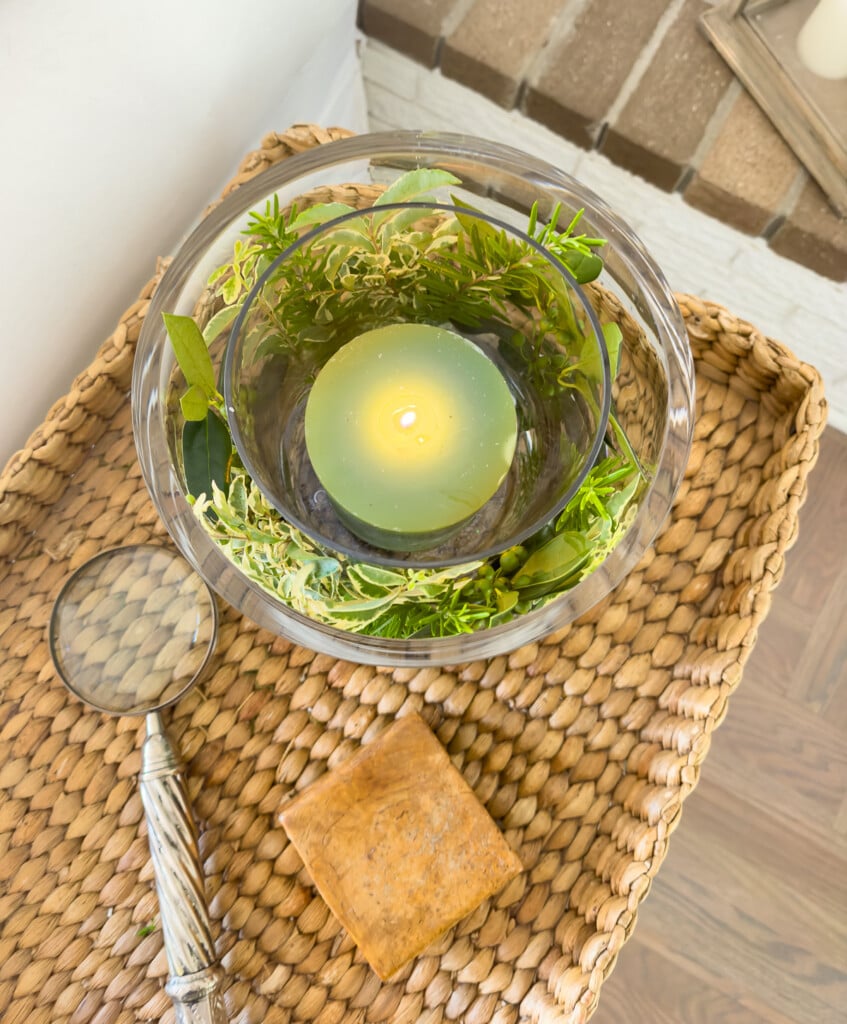
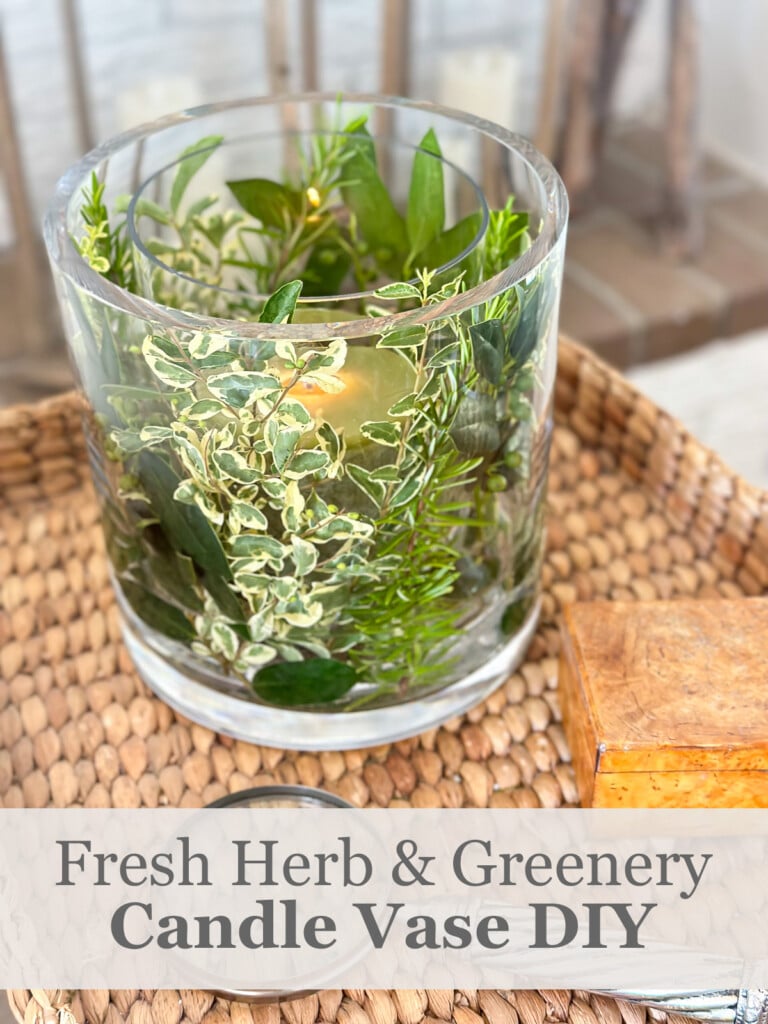
For my vase I searched my yard for greenery clippings in a few different shades of green and texture. As you can see I gathered a mix of rosemary and cuttings from shrubs.
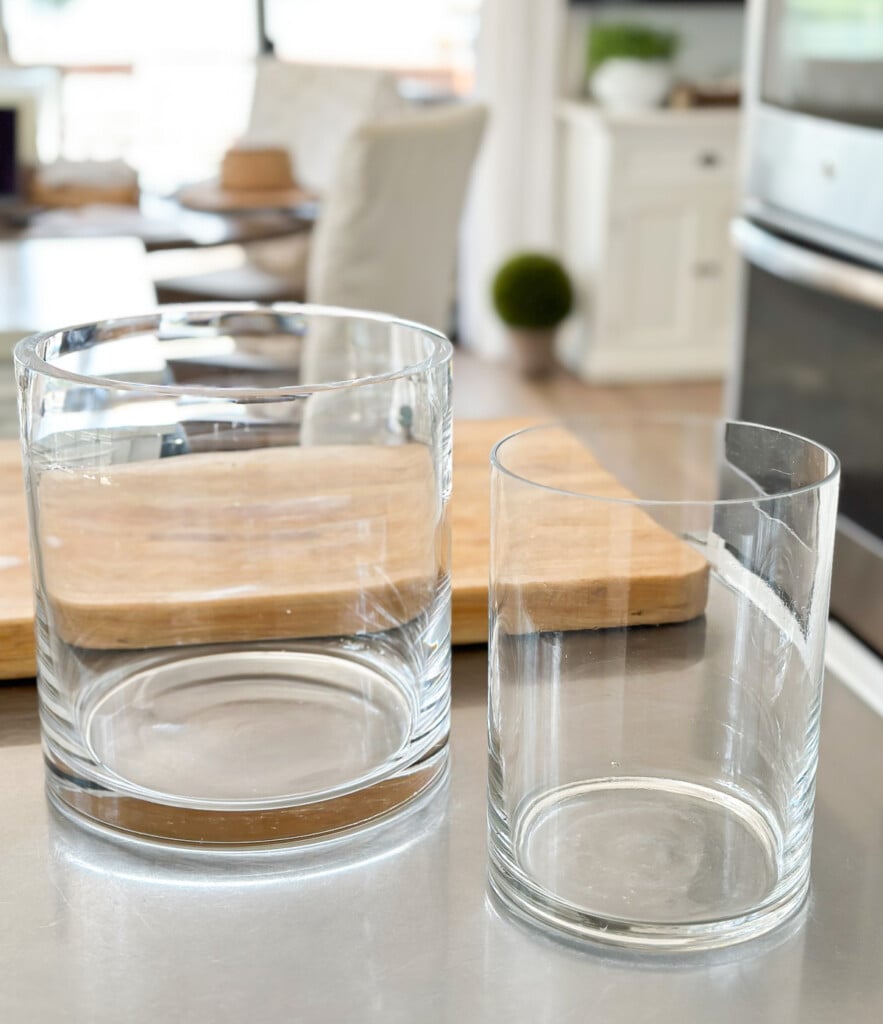
If you don’t have any vases/jars like this, head to a thrift store or dollar store where you will find them in abundance.
Once your DIY glass candle vase is assembled it can be used as a table centerpiece for a side or dining table for any season. For the holidays, consider using pine or holly clippings to make a fast and easy Christmas dining table candle centerpiece.
materials needed:
- 1 small and 1 large straight sided vase or glass jars like two sizes of mason jars – The smaller vase/jar needs to fit into the larger one.
- Herb or shrub clippings
- Garden clippers
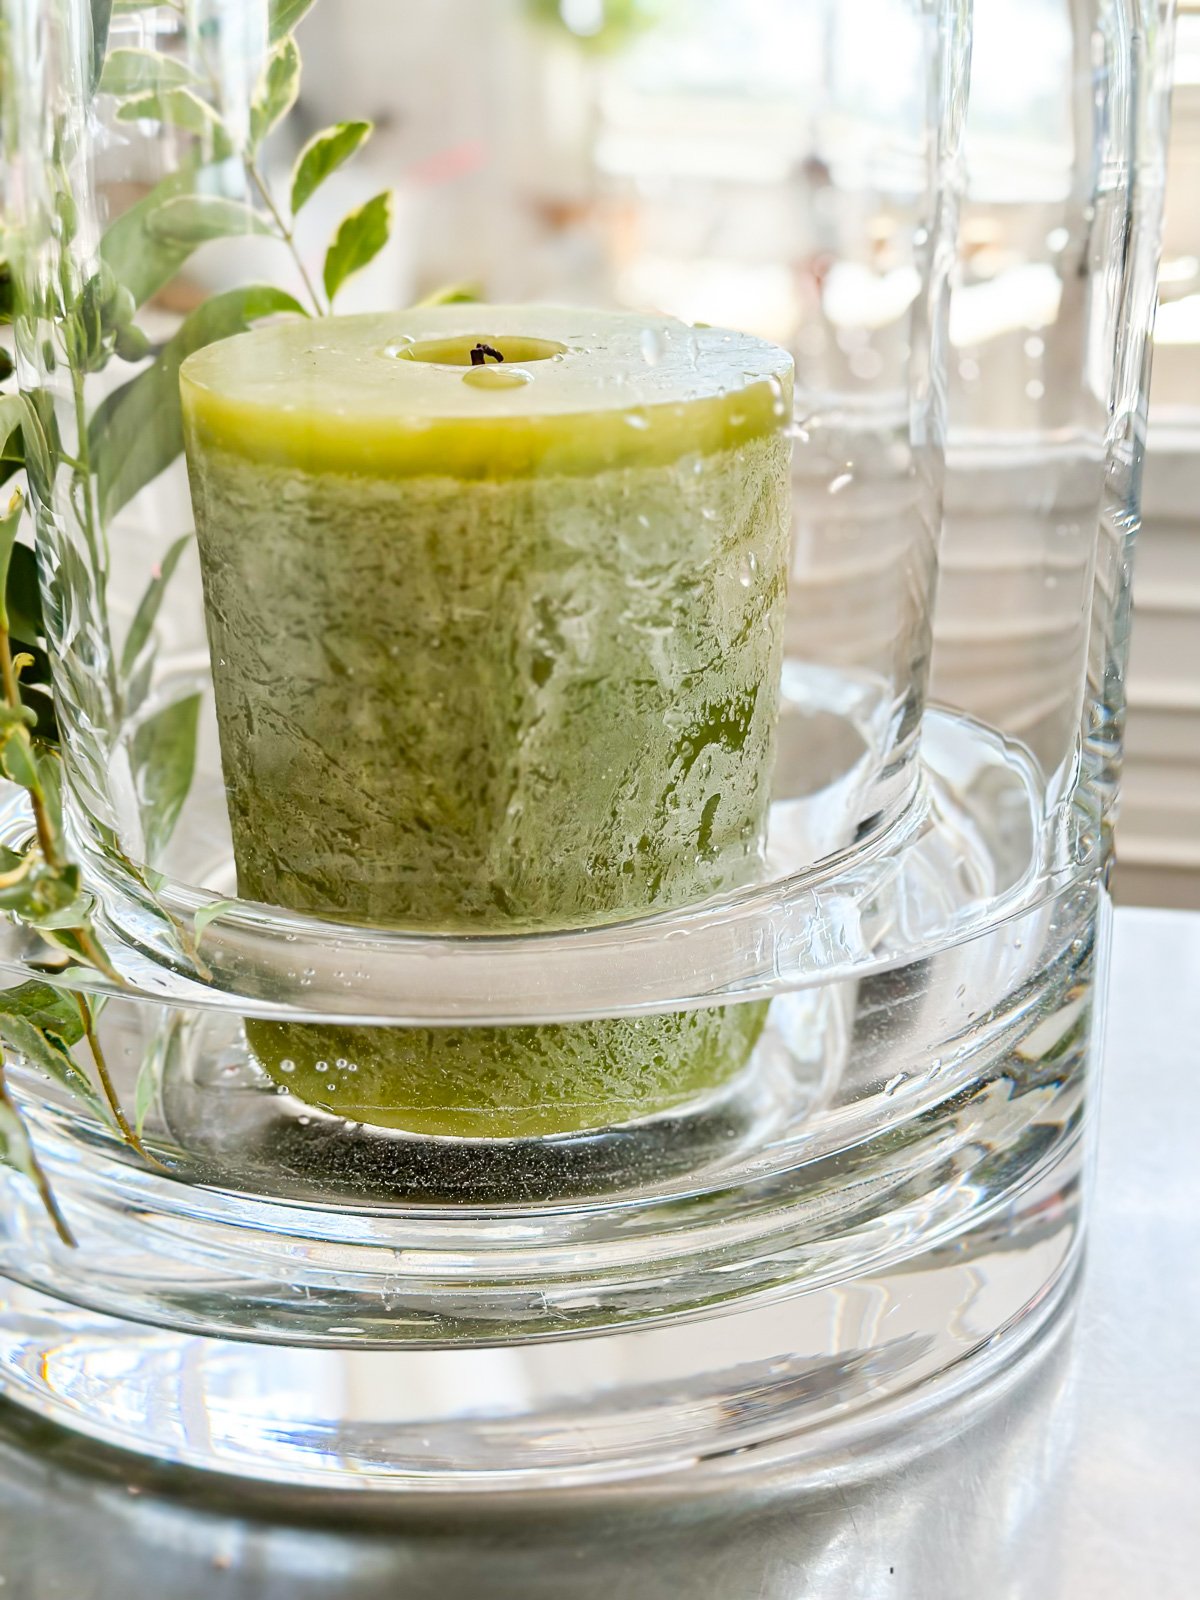
- Pillar style candle
- Water
Time needed: 15 minutes
Easy to Assemble Glass Candle Vase
- Gather Materials
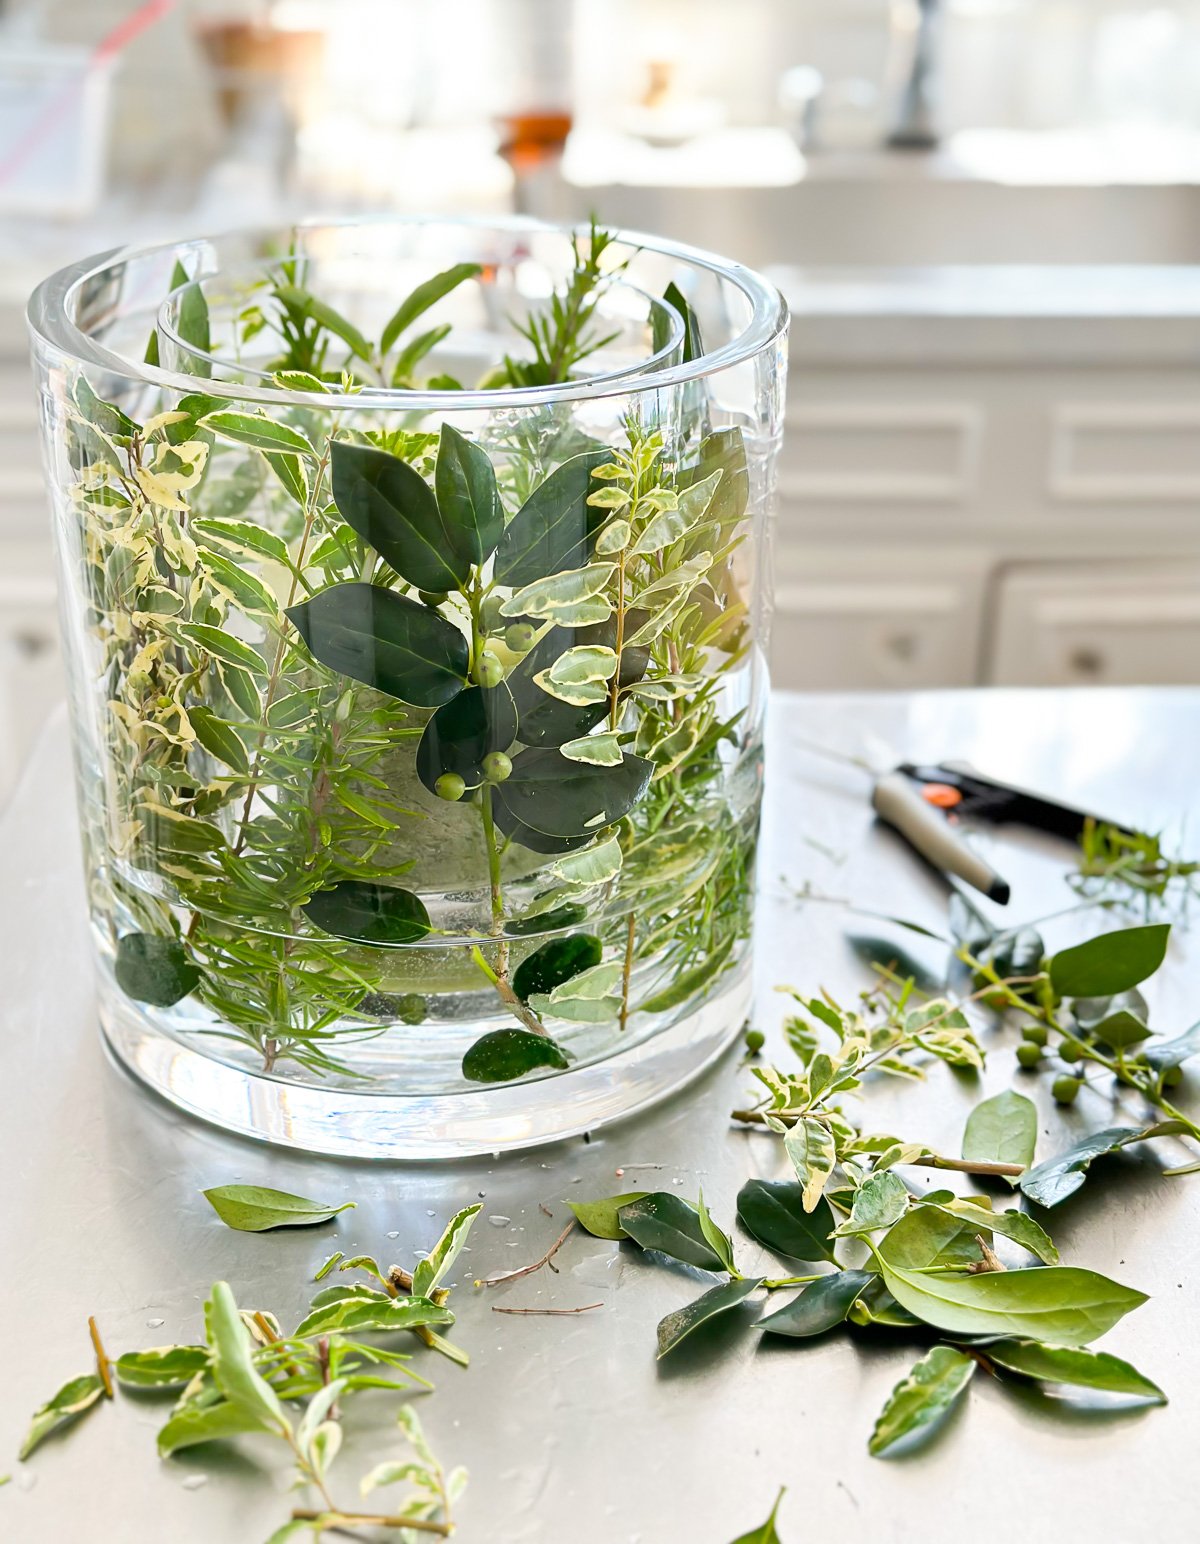
Go out in your garden or yard and cut a few clippings from herbs or shrubs to the height of your vase. Cut enough to fill around the diameter of the larger vase.

- Set Up Vases
Place the smaller vase into larger vase. Fill bottom of larger vase with about 2 inches of water.
Place candle inside smaller vase.
- Place Clippings In Larger Vase
Cut each clipping so it is slightly shorter than the vase. Place them between the two vases making sure the bottom of each is in the water.
Note: Keeping each clipping shorter looks better, but also keeps the tops away from the candle flame.
- Place on a Table
Once you have assembled the candle vase, use it to decorate a table or counter. After a day, check water level to keep the greenery fresh.
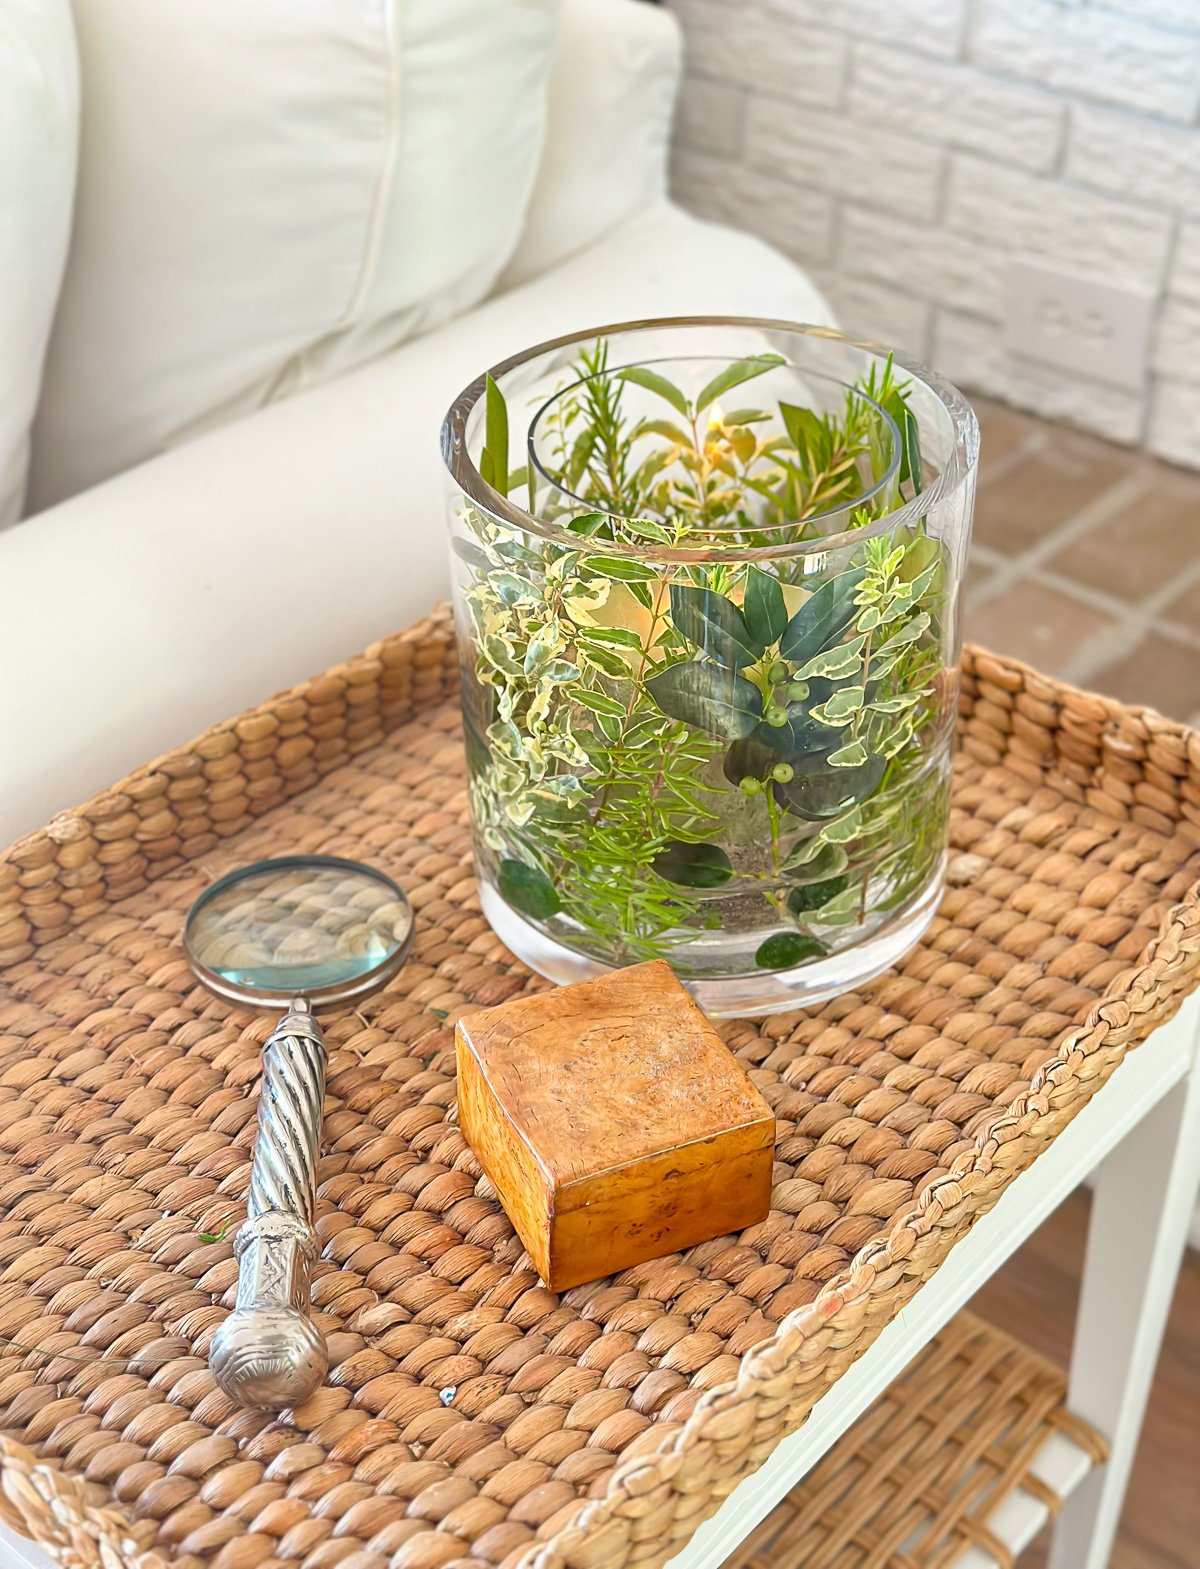
Assembling a natural greenery candle vase like this not only adds a whisper of summer to your decor, but also instills a sense of peace and tranquility, replicating the serene beauty of a fragrant summer herb garden.
More DIY Vase Ideas
- Twisted Paper Ribbon Vase DIY & Bonus Idea
- Simple Fall Vase Ideas That Will Make Any Space Feel Cozy
- High End Dipped Vase vs. Free Knockoff
- How To Make a Rustic Twig Vase
- Painted Glass Vase for Springtime Decorating
- Flower Vase Made in 10 Minutes
- Brown Paper Bag Vase Made in Minutes
This candle ..greenery design..is so easy, n quite spectacular.. luv it. Thank you
Thanks Anji -:-)
I just did this! I’m so excited that I was able to pull this off so quickly. I used my grandmother’s large brandy sniffer that we use as a vase, I tried to attach a photo, but it didn’t work. Thank you so much for this easy idea, this is great to do for all different seasons.
Hi CC – What a great idea to use a brandy sniffer to make the vase. Thanks for sharing what you did.
Thank you so much for linking up and sharing this fabulous post on Farmhouse Friday. I featured it today. Hope you link up again soon. pinned
What a neat project, Diane! I love anything free, so using clippings from the yard is amazing. The green colors of those different plants are so pretty combined together! Such a simple way to add texture to a space. Pinned!
GORGEOUS vase, Diane!!
Don’t forget to join us over at the Creative Crafts Linky Party every Wednesday through Sunday
https://creativelybeth.com/team-creative-crafts-linky-party/
Followed and Pinned!
Creatively, Beth
I think I might borrow this idea for the next family gathering, using all herbs. Maybe Thanksgiving? I have many pillar candles just waiting for their chance to glow. (:
This is such a refreshing-looking candle holder/vase idea and, as always, thank you for the excellent tutorial!
Now that’s delightful and innovative and beautiful Thanks for the idea
Hi Heather – When I saw the idea in the decor magazine, I said to myself – how easy it was and better yet, I had everything to assemble it. :-)
This is a great idea and just what I need to do. I have two Ikea glass jar vases that I put Christmas decor in. After the holidays I push them out of sight (kind of) under a table because I have no place to store them. I was just looking at them the other day and wondering if it was time to pare down and “declutter” them, since most of the year they are an annoyance. Now I have a new outlook – I have plenty of herbal and floral cuttings that will go perfectly in those jars. Thanks for the inspiration!
Hi Linda – Good timing for my post. If you had gotten rid of them and then read my post, you would have be annoyed that you had decided you no longer needed them.
I have vases like these!!! I love this idea and can’t wait to try 👏. Thank you!!
Hi Lynn – Once you assemble the greenery it literally takes only a few minutes to make it.
I love this idea!! I’m going to do it this weekend for a special place setting! I already grow the herbs and I’ve got numerous glass jars, & candles, etc. but I never thought to put them together this way! This is why I love your blog!
Hi Pam – So happy to hear that you have all the materials to make one or more of the vases. Thanks for loving my blog. Best thing a blogger can hear. XO
Great idea! I just finished two vases-one square and the other rectangular-that I saved from flower deliveries. Bought some ‘glass gems’, glued them to the vases and then sprayed them with white paint. I have seen vases like mine for big bucks at Pottery Barn and other retailers. Crafty women rock the world!
Hi Elle – What a fantastic idea. I have a box of the gems, now I know how to use them. I bet it looks exactly like the textured bead vases in high end catalogs.
Perfect craft project for these hot summer days. Even though it really adds something special to a room, it requires little effort.
Hi Nancy – I agree. With the heat and not wanting to take on any big projects over the summer the vase was just the right type of project. :-)
Remind us of this neat tip next Christmas please. It is a keeper for sure.
Hi Pam – I will. I just placed a reminder on my blog posting calendar for December.
How lovely this is. And it looks like it will be easy to put together. Thanks for another great idea, Diane!
Thanks Chris
Very nice!
Cute and clever.